
This tutorial is for Node.js and Express 4 Beginners.
Express is a node.js web development framework which comes with various
features such as rendering, routing, REST controls.
In this blog, I am not going to use JADE which
is a markup scheme used in most of Express project, instead, I am using basic
HTML page as markup language.
In this tutorial, I am
going to show complete steps which you may need to get started with web development
using Express 4. So here are the things which we are going to cover.
- Understanding directory structure (Very important)
- Creating Package file and installing dependencies (such
as Express or Mysql etc) using NPM.
- Creating Express Server.
- Creating Router to handle the request.
- Rendering HTML pages to deliver according to routing
request (using EJS).
Step 1: Understanding directory
structure
This is very important
because if you do not know the flow of the whole system and which file is
running and where it is stored, what time it has been called then I am sure
your understanding of code will not be up to mark.
Here is the directory
structure of the sample project which I have made to demonstrate.

Step2: Creating package.json
This is a JSON (
JavaScript object notation) file which contains every information about your
project. Information may include Name, version, description and may vary
depending upon the project.
In package.json one of the important things is
“dependencies” which is nothing but the tools you need
to run your project. In our case, we want Express and EJS so we will mention
those in our package.json file.
Go ahead and create
any folder and inside that folder create a file named as package.json and put
the following content in it.

Make sure that name field
should not contain blank spaces for example “express web app” is
not allowed, in place you may use “express_web_app”
or “express-web-app” but no spaces !
Some notations are there in dependencies which
I’d like to mention.
- “~” means either that version
of express or ejs or above than that but not below that.
- “*” means any version of that
package.
Step 2.1 : Installing
Dependencies using NPM
Till this step, I am
assuming that you have created any folder and had put “package.json” file in it. Also, I am
assuming that you have Nodejs and NPM installed in your system. If not go to
the official site, download and install it.
External Link : Download Node.js.
Open up your command
prompt or terminal ( in my case ) and switch to the folder you have created
where package.json is placed. once switch type “npm install” and wait till it download and
install dependencies.

Just wait and let NPM do
the rest !
Step 3: Create Express Server
Till this step we have installed dependencies and created package.json. Now it’s time to create
Express server to deal with Request and response by client. Go ahead and create
file and save it as server.js and write these code in it.

This is a basic express
server which basically does nothing. If you will run “nodejs server.js” then on console it will
show you message and on browser after typing localhost:3000 you
will see nothing but a blank page and that’s because we have not defined the Router of our project yet.
Step 4: Router to handle Request
We have our Server ready along with every
package we need. Now it’s time to tell our Server that on a request from
browser what it has to do. That’s in a technical term called a Router which
routes the application according to request.
Let’s create one simple router which respond
to request and print “Hello world” on browser. Add this line in Server.js before listen() function.

Save the file and run the Server using “nodejs server.js” or “node server.js” and go to URL http://localhost:3000 in your browser. You may be able to see message in your
browser. This is just an example of basic router.

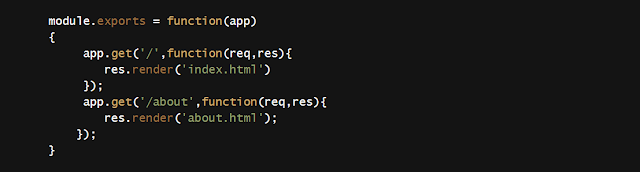
It is always a better practice to separate the
router code and server code in different files. As i have shown in directory
structure , create folder called “router” and inside that folder create “main.js” file and paste following code.
Save the file and do not
run the code now. What is module.exports ? Since we
have placed our code in a separate file and still want to use it in our Server
file.
To do so we need to expose the functions which
we want to use in a different file and that is what module.exports does.
Step
5: Render HTML page and send them in response
Now it’s time to do
something complex stuff. Yes this is bit complex but i will explain it simply.
The EJS package which we have defined in
package.json file is allow us to render HTML pages. But before that i want you
to create two HTML files named as “index” and “about” and put normal HTML codes.
Once done then in project
directory create folder called as “VIEWS“ and put those HTML files in it.
Now it’s time to modify Server file because we
have made lots of changes in the project. Here is the modified and final Server
file.
File name : server.js

Notice some changes ! Yes we have additional
four lines of code and those are as follows.

Line 1 : we are basically adding our main.js which is our router file and
passing app which is instance of express to it
because we need it to send response to browser.
Line 2: This line
defines where our HTML files are placed so that Server can locate and render
them! Easy enough.
Line 3: This line
set the view engine or simply presentation factor to EJS which is responsible for HTML rendering.
Line 4: This final line
will tell Server that we are actually rendering HTML files through EJS.
Everything is done ! Let’s run
Okay, amigos! Let’s run the code. What all you
need to do is open up your Terminal and switch to our project directory. Then
just type
you should be able to
see a message in the terminal that Server is running.
Open your browser and
go to http://localhost:3000/ and this is it. You may be able to see
whatever you have placed in HTML pages.